Showing posts with label Hinckley Triumph. Show all posts

Monday, July 29, 2013

Gray's Charcoal Grey Trophy 1200

I've heard from other T300 owners from time to time since I started this blog. One such gent is Gray , who is the proud guardian of a 1991 Charcoal Grey Trophy 1200 mark 1,  serial 000232. Yes, its even more venerable than my own 000544.
Spot the Difference 1: Publicity shot, early 1991
Spot the Difference 2: August 1991
Gray's 232 is a two-owner machine (whereas I am the 12th owner of 544) and he has some documentation that sheds a bit of light on its past. She was bought from Bill Head Ltd in Preston on 25th of July 1991, with a 1st of August registration for that year, make this bike one of the first 'J' plates out there. I believe my bike was purchased from Eddy's of Leeds because that was on the number plate when I bought 544. With so many prior owners in my case though it's impossible to say if 544 when through Eddy's hands (and a change of plate) in the mean time.

The invoice shows the VIN as 232 and the engine as 240 - a difference of eight engines. I think they were test engines produced by the factory as part of the early refinement process. Hinckley Triumphs do not have matching engine and frame numbers. My bike's engine number is 561, a difference of seventeen, rather mysteriously. I'm guessing this is because engines were taken from production to serve test and quality sampling purposes.

I've read in several sources that the first months of manufacture were certainly intensive period for the R&D folks at the factory as well as for production line staff. Triumph were committed to a continuous improvement process, redesigning and introducing changes as soon as they were approved. This contrasts with the 'model year' approach, where ideas and designs for changes are drawn up during one model year and then an aggregation of all such changes are released for the next model year.

Wow - looks pristine to me. Very fancy levers.
It is very unusual to see fairing lowers that are entirely unblemished. The high weight distribution catches out most owners when pushing or paddling about, resulting in shallow scrapes and scratches. Gray's bike seems to have escaped such insults.
Really lovely condition. Nice rabbit hutch too ;-)
This is where the red screen came from - not to Gray's taste but maybe suits Lancaster Red rather better than Charcoal Grey (Metallic).

Cheers Gray.

Saturday, July 6, 2013

A Long Trip Home for An Old Trophy 1200

Now there is a new Trophy 1200, it seems reasonable to describe my bike as an 'old' Trophy 1200. Those venerable owners of a '60s Trophy would no doubt laugh at the idea but time, like a living river, never ceases to flow.

For my second Big Trip, I decided I'd ride number 544 home to Hinckley. First, a spruce up:

Can't have her looking shabby, can we? In the process I found some of the paint on the rear caliper has lifted. My fault - cack handed with the brake fluid last time I bled the brakes. It is interesting to see that the special metals primer is considerably more resistant to brake fluid than Smoothrite. On the plus side, I was gratified to see that the the rubber flap I added has been successsful at keeping road muck off of the swingarm linkages. The were coated in grime but not grit and muck. Fab.

All dressed up and actually ready to go

Comfort break in Bradford on Avon - some more comfortable than others?

A Jumbo at Kemble Airfield


 I stopped at a couple of Landmark Challenge waypoints on my journey. Zoom in on the plaque at the back of the bus shelter to find out why the pub is named after Joseph Arch.

Outside Triumph Factory Number Two
 It isn't too hard to find Triumph at Hinckley after getting to Dodwell Bridge Industrial Estate - there is a sign for 'The Motorcycle Factory'. It leads to the opposite side of the estate from the A5. I have visited a couple of times before, most recently for a factory tour at the Triumph Live 2010 event. I had heard that tours don't run any more so did not expect to be able to do anything other than photograph the bike outside and so it turned out. Friday afternoon may not be the best time to visit because I think the factory is in maintenance mode then.


Those of you who have followed Triumph from the early '90s may recognise the name Jacknell Road. It is the site of the original Triumph Hinckley factory that burnt down in 2002. I was unsure if the site was at all active, or even if it was still owned by Triumph. But this is where my bike - and all 1990s Triumphs - were made. This is as near to 'home' as it is possible to imagine for number 544. So I decided to drive up and down it, just because I'm soft in the head in precisely this sort of way.


My reward was to see that the site is definitely owned by Triumph, very active and called Triumph Motorcycles Factory 1.  A very friendly and professional security guard took the trouble to phone into the factory to ask for permission for me to photograph my bike in front of the building (thanks Kumar!). That was what I had hoped to do. Better yet, a superb gent called Mark came out to see my bike and talk to me about it. Thanks very much Mark. You made my day.

Mark is in the warrantees and service arm of the business. His top tips for keeping T300s in good shape is to always use a torque wrench when tighting up the chain adjusters and to change your coolant no less frequently than every three years. Especially the coolant! You have been warned.

Any nothing much else troubles him in the servicing line for T300s. They are built like tanks, as we know.


 Last Landmark of the day: Moira blast furnace near Burton-on-Trent

Hand prints were cast into the uprights at the heart of the Moira furnace

OK, so it is clear that Triumph Motorcycles Limited has a loose connection to the firm that Mr Edward Turner made famous but I wanted to visit Meriden, where the second Triumph factory used to stand. The connection between Meriden and Hinckley Triumphs is deeper than corporate historians can see. A number of the former employees of the Meriden factory went to work at the Hinckley plant. One of them featured in an early Hinckley brochure coach lining Thunderbird tanks. Even if that was not the case, the care and enthusiasm lavished over these machines, whether made in Meriden or hewn in Hinckley, has infused them with something of a shared spirit. Their common heritage, not just the name on the tank, sees a number of them in common ownership today. So I don't think it entirely silly that I chose to stop by Meriden, to ride the roads that factory testers would have belted along on T20s, T90s, T100s, T110s and of course the unapproachable T120. Hearing the totally different sound of a T300 echoing off of the town walls, filling the centre around the monument to fallen cyclists, I was sure the ghost of Mr Turner would have smiled in appreciation.
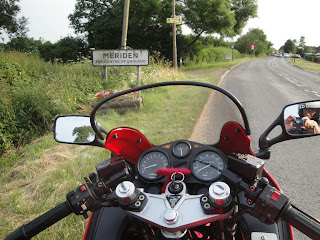
Late in the day, so it was all closed up, but the National Motorcycle Museum is only a few miles away from Meriden so I pulled in for a couple of pictures. 
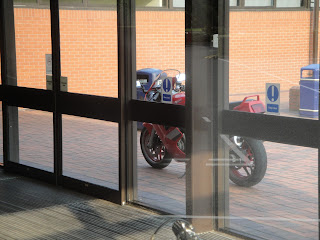
A legend outside ...

... where Legends Live On

Wednesday, July 3, 2013

Alternator - sheered bolt and squashed cush rubbers

My Daytona had been rattling for ages from beneath the carbs. I'd noticed it only did this when the alternator was not under load. As soon as I switched the lights on, the rattle went away. Amazing but true. The light switch was a rattle controller! 

Reading around, I'd found people with this problem saying it was to do with a worn alternator cush drive. On a visit to Sprint, I talked to Trevor about it and he said it was far more likely to be a problem with a bolt that holds a rotor onto the alternator itself. It turned out to be both ...

The pictures above show the bolt loose on the driven rotor (23 in the schematic) and the replacement bolt next to the remains of the original to show how much was left in the alternator rotor. The drive and driven rotors have four vanes the fit into one another, cushioned by eight rubber segments as the 'cush drive' (number 20 in the schematic below).
Parts schematic for alternator drive gears
 The pics below show the worn cush drive rubbers in the drive rotor and comparing them to the new replacements.


I'd also had some trouble with the starter motor so pulled that off at the same time as removing the alternator. This meant draining the coolant because the rear coolant hose runs from the back of the cylinder block to the pump and obscures the starter.

Draining the 900's coolant - looking grubby ...
... but the black finish always comes up really well with degreaser and a bit of gentle agitation
The bolt that retains the driven rotor is 'encapsulated', meaning it comes coated with a vibration-resistant coating. As a result, it was hard work to get the remains of the original bolt out. I had to drill it right through. The main trick is getting the drill bit central in the remains of the old one and holding the work still. I don't have a pillar drill but a Record drill stand and press vice. The alternator is a very awkward shape all the same so I had to put a lot of packing around it to get the press vice to grip.
Drilling out broken M6 bolt with a 5mm HSS bit

After drilling and cleaning threads with a tap

 I'd done a fair job but the internal threads were clipped by my drill. Fortunately the encapsulation is meaty enough for me not to worry about that too much. I was able to torque it up carefully to the recommended level so all looks well.

Torquing up the replacement bolt, holding the driven rotor with an adjustable spanner
The replacement cush rubbers make for a close fit between the drive and driven rotor. I held them into the drive rotor with red rubber grease. It was a fiddle to line up the vanes on the driven rotor to get the alternator back in place but eventually went in with zero slop.


Mission accomplished.

Friday, November 2, 2012

A Trip to Trevor

I took advantage of the slightly less appalling weather today to visit Sprint Manufacturing at Upton Lovell in Wiltshire. Although the air temperature is pretty low now, with the damp taking effect, it was a nice run out. The sun lit up the gold and russets in the trees along with the remaining green leaves along the way.
Trevor is the Chief at Sprint Manufacturing. His premises are well off the beaten track, business being overwhelmingly made up of web and telephone mail order. It's not a big trip for me to get there in person though and a nice ride to boot. I found him in the midst of applying a gel coat to a hugger he was making for an Australian customer. A top quality job, needless to say. He told me the classic fairings side of his business are popular in Japan, to the tune of an order a week in the summer.
Anyway, Trevor has helped me out on many occasions, supplying good advice, good parts and good humour at all the right times. Several times on previous visits, I'd said I'd bring my 1200 for him to see when it was finished. I'm sure he's seen dozens of the things before so it was more of an excuse for me to get out and seek approval from the master than a case of me showing him something new.
So I set the bike up on its centre stand, started the motor and asked him what he thought. Here he is, focusing his full force of his mystical powers to commune with the inner workings of a T300 in action:

A visit to Sprint Manufacturing 2

He was impressed with the quietness of the motor compared with others of its ilk. He told me the early die-cast cases (with access hatch for sprag and alternator drive gears) are noticeably quieter than the later Cosworth pressure sandcast cases. I forgot to say that the 1991 bikes have foam-lined fairing panels too, dampening the sound further. And the result. Well, was it in doubt? I think it met with his approval.

A visit to Sprint Manufacturing 1

The bike had run beautifully all the way there. Irritatingly, I had more fueling problems on the way home. Maybe the bike was sad to have had to leave the cosseting world of Sprint. But seriously, I think I've got four issues to deal with, two of which are probably self-inflicted. 1/ The loose sheets of liner are wrapping themselves around the fuel tap's integral filter 2/ the fuel tap prime position isn't passing any fuel, 3/ the angle of the extended fuel pipes and filters I fitted seems to be causing at least one hose to fold. 4/ The extended pipes are also putting pressure on the vacuum pipe to the rear of the fuel tap. So I shall address all these issues before taking her out on the road again.

Thursday, October 11, 2012

Daytona vs. Trophy cockpit

I thought it would be interesting to do a side-by-side comparison of the layout of the '94 Daytona and '91 Trophy cockpits. So I have tried to photograph the two of the so the angle and distance of the camera was pretty much the same. I haven't quite got it right, but it's close.
The key points of reference for comparison are the ignition lock for height and fork centres for width. The bars are also the same length and have the same pull-back angle so help to show how the two variants of the Hinckley T300 project relate to one another. Bars can be changed though so there is potential variability. In fact, the height of the bars is one of the main things that define what they are like to ride for pitching the rider's weight forward and more behind the screen, or backward/upright and more in the air.

DSC05648 Trophy cockpit
1994 Daytona Cockpit 1991 Trophy Cockpit
The Daytona fairing is considerably wider than that of the Trophy at the top of the screen - maybe 30% wider - though the width is similar at the level of the top yoke. In the pictures above, this is easiest to see by comparing where the line of the fairings crosses the switch gear left and right.

The screens are both standard fitments for their years. The Daytona screen is marginally lower than the Trophy. The Daytona bars are mounted beneath the top yoke, the Trophy's are above, a difference of about 2 inches. The effect of bar and screen height when riding is that the Daytona keeps more of the wind off but directs windblast into the middle of my helmet. I'm 6'4'' though so it's conceivable a shorter rider would be out of the wind altogether ... if they could reach across the long tank to get hold of them in the first place!

I have found when riding the Trophy that my shoulders are just in the wind but the wind blast off of the screen hits me around the top of the chest. My helmet is in clear air so it's much quieter because there is less buffeting and the volume of wind hitting the helmet is lower.

The Daytona cockpit isn't quite standard - I made my own carbon fibre clock bracket to the same dimensions as the original and fitted a time clock just above the speedo.

Tuesday, October 2, 2012

Off to the MOT

For readers outside of the UK, the MOT is a mandatory annual test that all motor vehicles must pass if they are to be used on public roads. MOT stands for Ministry Of Transport. My bike had been off the road and without the need on an MOT for two years so, before I could allow her to roam free once more on British roads, I had to get her to my wonderful local MOT tester.

Although of course I had repaired, refurbished and/or refitted pretty well all of the running gear, I rechecked everything I could think of and road the bike backwards and forwards on my little drive. So the night before my MOT appointment, I ran the bike through at set of checks I've got used to performing in advance of the annual exam. I couldn't find any obvious problems but knew the headlight wasn't working as well as it should. I'd spotted that the wiring from the main loom was thin compared to the little harness that connects from the loom to the H4 headlight bulb.

The feel of the motor was just superb in these little tests. I had expected it to be running unevenly because I had reset the carburettors in cleaning them and so thought they'd be out of balance. As it happens, my attempt to get the carbs somewhere near by visually adjusting the DV carb throttle plates so they were all opening at about the same time with the throttle. The whole feel of the bike was just fantastic. I'm sorry that this is such an emotional and uninformative term to use. It's just that, for me, it was everything and more than I had hoped for. It's true, the gear selection felt a bit harsh - a real clunk - but I was used to this from my Daytona 900 when that motor was younger. The sense I had, just allowing the motor to pull the bike along at walking pace, was that it was willing and turbine smooth. No juddering, hesitation or shaking: just an even solid thrust.
This is how she sounded and ran at that particular moment:

You will see that the digital oil pressure and oil temperature gauges appear to be working correctly. They are powered from a spare coil positive wire courtesy of the fact that the loom was common right across the whole range in 1991 (the four-cylinder engines need two, the three-cylinder engines use three coils). So when I change the engine kill switch from off to on, the gauges are powered up and flash all segments of their LED display in the process. The then start to read oil temperature (right-hand gauge) and oil pressure (left-hand gauge). I discovered that the lowest temperature that the temp gauge can show is 25 degrees centigrade. So when it shows 25, it doesn't mean anything at all. The fact that it starts up in the 40's in this video is because the motor was warm from the first startup. The striking thing for me about the oil pressure is how high it reads when the engine is cold. Cold oil must be a lot thicker than oil at the correct operating temperature. I shall write more on this in a later posting. I had decided not to refit the fairing panels until I was confident that everything that would be hidden by them was working properly and leak-free. Rear fairing panels refitted, front panels off for shakedown test

Setting off for the MOT next day threw up my first problem: she was only running on two. I couldn't believe it after the 'pre-flight checks' the previous evening. Oh well. I had an appointment to keep so set up in lumpy fashion for the test. 

I have got to know the MOT tester at my local bike shop over several years. I never ask for any special consideration, though probably get it. I like the guy very much because he really knows what he is doing, is friendly and considerate and won't cut corners on the test. He found two problems with the bike. One was not unexpected: the headlight beam was out of adjustment. The other was that the electrical cables from the right-hand switch gear were catching as the handlebars turned from lock to lock. He allowed me to adjust the former and solve the latter with a cable tie. Everything else was in order and he complemented me on the cleanliness of the underside of my engine.
What a guy!
He said he thought there was a mistake in the wiring of my H4 bulb because the dip beam was very yellow in colour. He said this can happen if the wrong H4 terminal is earthed. So that needs checking. The dip beam on early Trophys is notoriously poor anyway and I had decided I'd address the fact that the main loom appears to have under sized feeds for the headlight anyway.
The nett result is one 1991 Triumph Trophy 1200 back on the road in Britain, 21 years after it first left the Hinckley factory. A great result for me.
DSC05539
After the MOT Just back from the MOT test station 

We exchanged some thoughts on the rough running engine formed a plan to sort it out.  


Tuesday, September 25, 2012

Radiation

I had decided to fit a radiator from a later model Trophy 1200 because they are quite a bit wider and my bike had been running very hot before I took it apart. The 1991 models were all fitted with identical radiators, from the 750 Tridents through the 1200 Trophy. I'm guessing that hot running had been an issue with the early bikes because from some time in 1992, as far as I can tell, the 1200s were fitted with a version that is about 5cm/2" wider.

Rusty steel radiator guard

I got a second hand radiator from a 1999 model. It came complete with fan and stone guard, both formed in plastic rather than steel as in the 1991 versions. My original radiator guard and fan housing were pretty rusty but I have more confidence in the finer mesh of the original guard than the plastic version.
Wider radiator with fan, plastic stone guard and aluminium grill
So I bought some gold anodized aluminium mesh from Homebase and cut it to size so that the plastic guard would hold it in place.
1999 radiator reassembled Radiator reassembled, showing plastic bodied fan

I decided to fit braided sleeving to all the hoses. I could pretend there's a functional reason for doing this but it's basically a cosmetic decision. The hoses on these engines are not pretty. I've either achieved a better blend to the look of it with the braiding or just drawn attention to it. You decide. I like it anyway.
Cooling hoses with braided sleeving

I'd checked that the thermostat was working properly before installing the top hose. I bought a jam thermometer to do this, heating a pan of water up with the thermostat immersed. The thermostat is marked '83' and it opened at about that temperature, according to the thermometer. So all's good there.
Checking operation of thermostat with a jam thermometer Thermostat fits into radiator top hose Totally unnecessary polishing - 83 marked at the tip, 07 91 (July 1991) on the body

The radiator is retained by two M8 bolts at the top, which also double up as mountings for the fairing subframe, and four M6 bolts at the bottom (two each for brackets on the lower corners).
Upper left-hand mounting bracket - also retains fairing subframe Radiator lower left-hand mounting bracket

I filled the radiator with a 50:50 mix of Bluecol and de-ionised water. That's a stronger mix than is needed in rainy England but the coolant also contains corrosion inhibitors so it seemed like it would offer more protection than a lower ratio might.
Filling radiator with Bluecol and de-ionised water DSC05164

I had fitted stainless collars around the ends of the hoses, under jubilee clips. With the system filled I noticed a slight leak from the hose which connects the rear of the cylinder block to the water pump. I removed the collar and then tightened down the clip more than I would normally do. The result was no more leak. I'll have to check all the joints come start-up, along with the oil plumbing I added for the oil temperature and pressure sensors.