Showing posts with label starter sprag clutch. Show all posts

Saturday, June 16, 2012

Under cover and on the case

Having got compression again with spark plugs back in the engine, and the back brake in working order, I could torque up the gearbox sprocket again and move on to replacing the refurbished engine covers. The sprocket had been very loose on the gearbox output shaft when I'd dismantled it so I wanted to be doubly sure it was firmly secured. Doubly sure means properly torqued up and the lock washer fully hammered down.   
One foot on the rear brake pedal,
the engine in first gear and rotated
up against compression, a lot of force
can be applied to the sprocket nut.

Drifting down a tab on the lock washer.
Things are starting to come together now to the point that a lot of the work I've done on other components is slotting into place. It made sense to refit the starter motor because access is just that bit better before the other engine covers are in place. The rear of the starter is blocked by a large water pipe that connects the rear of the cylinder block to the water pump.  

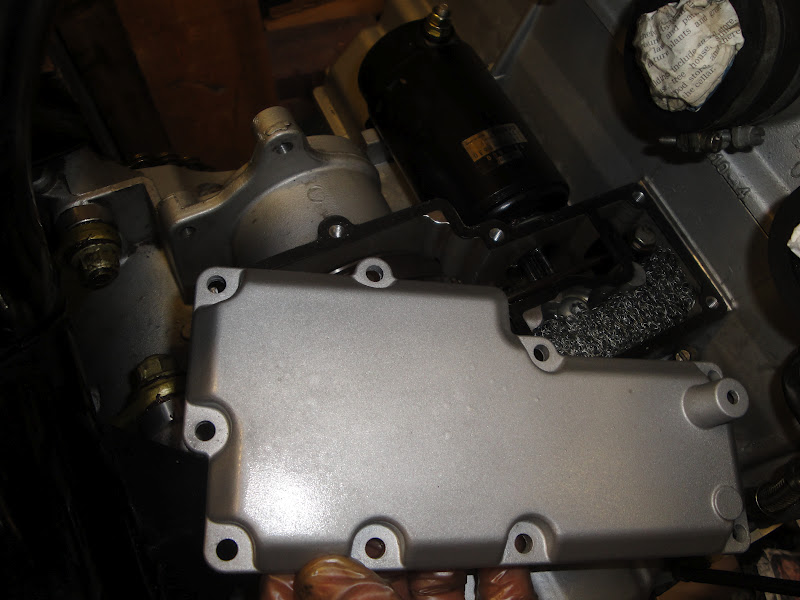
The starter engages with a gear train beneath an inspection cover behind the cylinders. On this very early 1200, there is a steel condenser mesh in a small compartment next to the gear train. A small link pipe connects the engine breather from the clutch cover to this condenser compartment, and another link pipe then connects from the condenser to the air box. Later models use a single pipe to connect the clutch cover breather to the air box. 


Slightly out of step to the way I did it but the clutch cover went on with a bit of fiddling. I wiped over the clutch basket with a WD40 and kitchen towel first - it has been open for about 18 months and had picked up quite a bit of dust and dirt. It was only tricky because of the bend in the little breather link pipe. I'd put a braided cover on it which may have made it less flexible than normal. 


 Meanwhile, back on the drive side, I'd got sprocket cover, alternator, water pump and crank end cover all ready to replace. Again, the internal surfaces of the engine all benefitted from the kitchen towel and WD40 trick. The difference under the crank cover is easy to see.


 Before the sprocket cover goes on, it's easier to reinstall the clutch pushrod. It's a very long steel bar that passes through a small seal just in front of the drive sprocket, and then into a housing in the sprocket cover for the clutch slave cylinder.

The sprocket cover also hold the dipstick. The dipstick protrudes into a small box cast into the sprocket cover which then runs full of engine oil when in service. The threads on this early dipstick are much finer than the ones on my 1994 Daytona 900. I prefer these early fine ones - I've crossed the coarse threads on my Daytona's dipstick twice. Very irritating.

The gear change shaft extends through this little box so is fully lubricated. There is a needle roller bearing in the sprocket cover so that runs in oil too. It could be one of the reasons that the gear change has such a positive and, with good oil at least, slick action. I protected the oil seal in the sprocket cover by wrapping the splines on the gear change shaft in electrical insulation tape before tapping the cover over it. The bad side of it is that it is only possible to check or change the gearbox sprocket with an oil change. I can live with that for the benefit of having the gear change shaft needle roller fully lubricated. Each to their oe


The sprocket cover is retained by five bolts plus another two very long bolts that also retain the clutch slave cylinder. I've been working on the clutch hydraulics today. They appear to have been depending on orange sludge rather than hydraulic fluid :-(


Friday, January 13, 2012

Starter motor

The starter system on early Hinckley bikes has a poor reputation. In particular, the starter clutch is known to cause problems. I think there are some key things to do to avoid trouble. One is to make sure the battery is always in good condition so it turns the engine over at a good speed, avoiding low voltage for the ignitor. If you are in doubt about the state of your battery after giving it a good charge, don't hesitate - just get  a new one. Another is, if the engine doesn't catch properly after turning over, allow the crank to stop spinning completely before trying again.

Starter behind alternator and
rear coolant hose
Finally, the starter system is a system - a set of components, all of which have a bearing on the way it functions as a whole. These include the starter button on the right-hand handlebar switch cluster, a heavy-duty relay (solenoid switch) behind the battery box, a side-stand interlock, the battery, starter motor and sprag clutch. So I decided I'd strip the starter motor itself to inspect and clean it.

Removing the starter was straight forward for me because I'd already taken off a coolant hose at the rear of the cylinder block to sort the cooling system. It is held in by two M6 bolts and, apart from these, just the main power cable from the starter solenoid (it earths through the engine cases in the usual way). The starter engages the engine via an idler gear before driving a large cog that is in turn attached to the sprag housing.

I could see a previous owner had attempted to strip the starter before because one of the two bolts on the starter's drive end cap was a bit chewed up. It was a struggle to free it but I have a good set of 1/4 inch wall-drive sockets that came into their own for this job.

.


There was plenty of dirt inside the body from wear on the starter's brushes. It wasn't hard to clean out  - just a case of applying patience and electrical contact cleaner. The brushes are held into the cap at the opposite end of the starter body. I carefully dragged dirt out from between the contact segments of the electrical windings and lightly polished up the surfaces with fine grade abrasive paper. 


Cleaned up and ready for reassembly

All back together again, aided by the Haynes manual