Showing posts with label clutch and crank covers. Show all posts

Friday, July 26, 2013

Things that haven't worked

I have documented many changes on this blog. My recent review of modifications have caused me to think a bit more about how well or how badly some of my efforts have worked out. So here is a list of things that have not gone so well. They are my attempts to 1/ paint the engine covers, 2/ paint on the rear brake caliper, 3/ wheel paint, 4/ repaint filler cap surround, and 5/ fit an oil pressure gauge. So, as you can see, it turns out my painting skills aren't really up to snuff :-(

1/ Clutch cover
First off, the clutch cover was in a horrible state. I had a go at getting all the old paint off but it was a struggle and couldn't remove all traces from the sections where it bolts on. There are quite a few difficult recesses and angles. The result over time is that my paint has bubbled up. Also, the VHT clear lacquer has started to yellow. The other covers I painted have not bubbled or yellowed, as far as I can tell. I put the clear lacquer on much thicker for the clutch cover than the others because I had polished up the Triumph logo. I wanted to make sure it was protected from the elements. In retrospect, I wish I'd gone easier with the lacquer and committed myself to keeping the Triumph shiny with autosol.

2/ Rear caliper
Perhaps I'm wrong to list this as a 'didn't work'. I had a brake fluid leak when I was bleeding the rear caliper. I thought I'd cleaned it all off afterwards but evidently didn't do a great job. Smoothrite is definitely not brake fluid proof. However, the Finnegan's special metal primer has largely shrugged it off, much to my surprise.
Smoothrite doesn't like brake fluid
3/ Wheel paint
I took quite a lot of trouble over the wheels. Really good degrease etc. then topped off with enamel red and clear lacquer. However the plain fact is that the finish is not robust and has chipped off in many places. I plan to get the wheels powder coated. I still like the red centres and silver rims but I'm thinking of trying a graded transition between the colours rather than a clean line. I've seen some three spoke wheels done this way. It could work on my six-spokers. I'll use the wheels from my Daytona whilst they are away. That's a nice thing about having a pair of T300s.
Enamel paint chips and scratches easily
4/ Fuel cap surround
Wheel paint doesn't like petrol
I stripped the tatty paint off of the filler cap surround when I was treating the tank with POR-15. I used aluminium wheel paint. First trip out, I dribbled some fuel on it getting the nozzle out at a petrol station. It immediately ate into the paint so now it looks tatty again. I had hoped it would be up to challenges like this because, after all, wheels live in a harsh environment. This paint is an acrylic formulation. Acrylic paint is just a terrible idea if there is any risk of getting petrol on it.

5/ Oil pressure sender
I bought the oil pressure and temperature gauges with senders (sensors) from the same supplier. They were cheap! Now, the temperature gauge has worked flawlessly and I have found the information it has provided reassuring and credible. Most of the time, for example, it hovers between 70 and 80 degrees. The factory manual specifies an oil pressure check with the engine warmed to 80 degrees. So that adds up. For what it is worth, the highest oil temperature I have seen was in Coventry on an extremely hot day after filtering in traffic for about 30 minutes. It was 97 degrees! Literally fry-an-egg temps. The engine shrugged it off though in its typically nonchallant power station kind of way, assisted by energetic blasts from the fan.
Faulty oil pressure sender
 The pressure gauge has always behaved strangely, jumping and falling by tens of psi for no obvious reason. It now reads 100 psi  (it's maximum) all the time. I've checked continuity and the wiring is fine. The sender is bust. I'll get a better quality replacement sender and see if it drives the gauge properly.

Work still to do
This is not a thing I have done wrong (a sin of commission) but things not yet done (sins of omission?). I decided to fix up my Trophy from the inside to the outside. The outside - especially the fairing panels - have yet to receive any TLC beyond cleaning. Their time will come, probably next winter.

Old scratches are still old

Ride safe!

Saturday, June 16, 2012

Under cover and on the case

Having got compression again with spark plugs back in the engine, and the back brake in working order, I could torque up the gearbox sprocket again and move on to replacing the refurbished engine covers. The sprocket had been very loose on the gearbox output shaft when I'd dismantled it so I wanted to be doubly sure it was firmly secured. Doubly sure means properly torqued up and the lock washer fully hammered down.   
One foot on the rear brake pedal,
the engine in first gear and rotated
up against compression, a lot of force
can be applied to the sprocket nut.

Drifting down a tab on the lock washer.
Things are starting to come together now to the point that a lot of the work I've done on other components is slotting into place. It made sense to refit the starter motor because access is just that bit better before the other engine covers are in place. The rear of the starter is blocked by a large water pipe that connects the rear of the cylinder block to the water pump.  

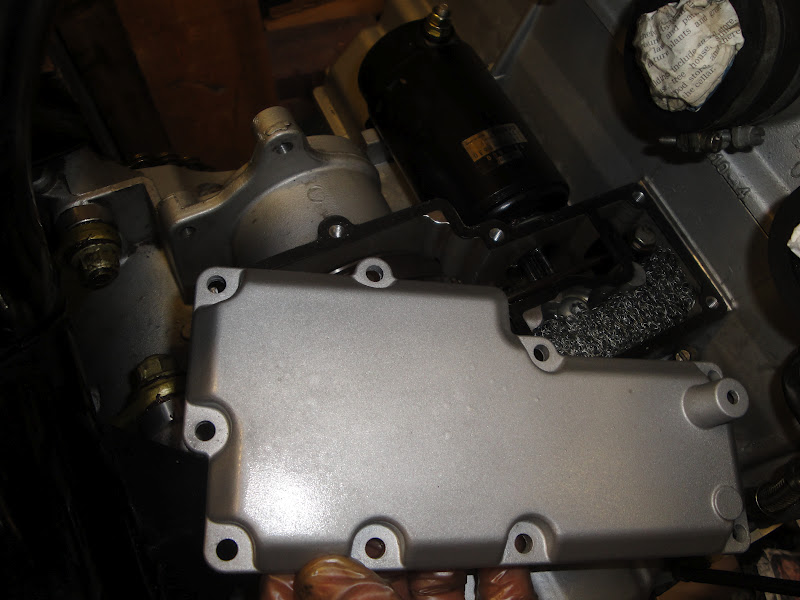
The starter engages with a gear train beneath an inspection cover behind the cylinders. On this very early 1200, there is a steel condenser mesh in a small compartment next to the gear train. A small link pipe connects the engine breather from the clutch cover to this condenser compartment, and another link pipe then connects from the condenser to the air box. Later models use a single pipe to connect the clutch cover breather to the air box. 


Slightly out of step to the way I did it but the clutch cover went on with a bit of fiddling. I wiped over the clutch basket with a WD40 and kitchen towel first - it has been open for about 18 months and had picked up quite a bit of dust and dirt. It was only tricky because of the bend in the little breather link pipe. I'd put a braided cover on it which may have made it less flexible than normal. 


 Meanwhile, back on the drive side, I'd got sprocket cover, alternator, water pump and crank end cover all ready to replace. Again, the internal surfaces of the engine all benefitted from the kitchen towel and WD40 trick. The difference under the crank cover is easy to see.


 Before the sprocket cover goes on, it's easier to reinstall the clutch pushrod. It's a very long steel bar that passes through a small seal just in front of the drive sprocket, and then into a housing in the sprocket cover for the clutch slave cylinder.

The sprocket cover also hold the dipstick. The dipstick protrudes into a small box cast into the sprocket cover which then runs full of engine oil when in service. The threads on this early dipstick are much finer than the ones on my 1994 Daytona 900. I prefer these early fine ones - I've crossed the coarse threads on my Daytona's dipstick twice. Very irritating.

The gear change shaft extends through this little box so is fully lubricated. There is a needle roller bearing in the sprocket cover so that runs in oil too. It could be one of the reasons that the gear change has such a positive and, with good oil at least, slick action. I protected the oil seal in the sprocket cover by wrapping the splines on the gear change shaft in electrical insulation tape before tapping the cover over it. The bad side of it is that it is only possible to check or change the gearbox sprocket with an oil change. I can live with that for the benefit of having the gear change shaft needle roller fully lubricated. Each to their oe


The sprocket cover is retained by five bolts plus another two very long bolts that also retain the clutch slave cylinder. I've been working on the clutch hydraulics today. They appear to have been depending on orange sludge rather than hydraulic fluid :-(


Monday, January 2, 2012

Clutch, crank and sprag clutch covers

I was very pleased with the way the Trophy's cylinder head cover had responded to my tender ministrations with Hycote VHT silver and clear. So I thought I'd do the same thing with the other engine covers. On the right of the motor, these are the covers for the clutch and for the crank and ignition pickups. All were tatty, the clutch cover the worst of the bunch. The picture below shows what lies beneath the right-hand covers, together with a glimpse of a chamber on top that contains secondary gear drives for alternator and starter.


The clutch cover is a very large casting incorporating an oil condenser labyrinth for the engine breather. There were  a couple of deepish scratches on its lower edge. More significantly, corrosion had lifted quite a bit of the paint and was clearly creeping upwards. The cover has a cast-in Triumph logo - I couldn't resist the idea of polishing it up.


For all that the paint was failing, it was incredibly hard to remove.  It took a lot of scrubbing with 3M pads, scraping and soaking in paint stripper to make any head way with it at all. Patience got a decent result in the end. However, in hindsight, I should have had the cases blasted clean.


 After two washes with soapy water and clean water, a day in the airing cupboard to dry out, I settled down to some spraying with VHT in my (too) well ventilated garage. Here is what it looked like after four or five light coats of Hycote Very Hight Temperature silver:


Another few days to thoroughly dry, then careful sanding with wet and dry on a foam sanding block took the paint off of the logo and brought it up to a good shine. 


Then it was a case of more washing off and allowing plenty of drying time before applying the top coat of Hycote VHT clear lacquer. 


On the left, there is a simple cover over the end of the crank. Later models run their breather through this cover - the early motors have the same arrangement as the 900s, breathing through the condenser labyrinth in the clutch cover.


I was tempted to pick out the Triumph on this side too but decided against it. I'm not sure why really. I might yet do that and give it an extra coat of clear.


There is also a top cover over the secondary gears behind the cylinder block, including an oil condenser mesh. The secondary gears couple the alternator and starter with the clutch basket. The starter spins the engine over by driving the clutch gear. The alternator is driven by the clutch gear when the motor is running.


Sprag cover


The very first engines has a secondary oil trap under the top cover, with a short breather pipe linking the clutch cover with a condenser chamber filled with wire mesh and a second breather pipe linking the secondary gear cover with the airbox.


Work in progress