Monday, July 29, 2013

Gray's Charcoal Grey Trophy 1200

I've heard from other T300 owners from time to time since I started this blog. One such gent is Gray , who is the proud guardian of a 1991 Charcoal Grey Trophy 1200 mark 1,  serial 000232. Yes, its even more venerable than my own 000544.
Spot the Difference 1: Publicity shot, early 1991
Spot the Difference 2: August 1991
Gray's 232 is a two-owner machine (whereas I am the 12th owner of 544) and he has some documentation that sheds a bit of light on its past. She was bought from Bill Head Ltd in Preston on 25th of July 1991, with a 1st of August registration for that year, make this bike one of the first 'J' plates out there. I believe my bike was purchased from Eddy's of Leeds because that was on the number plate when I bought 544. With so many prior owners in my case though it's impossible to say if 544 when through Eddy's hands (and a change of plate) in the mean time.

The invoice shows the VIN as 232 and the engine as 240 - a difference of eight engines. I think they were test engines produced by the factory as part of the early refinement process. Hinckley Triumphs do not have matching engine and frame numbers. My bike's engine number is 561, a difference of seven, rather mysteriously. I'm guessing this is because engines were taken from production to serve test and quality sampling purposes.

I've read in several sources that the first months of manufacture were certainly intensive period for the R&D folks at the factory as well as for production line staff. Triumph were committed to a continuous improvement process, redesigning and introducing changes as soon as they were approved. This contrasts with the 'model year' approach, where ideas and designs for changes are drawn up during one model year and then an aggregation of all such changes are released for the next model year.

Wow - looks pristine to me. Very fancy levers.
It is very unusual to see fairing lowers that are entirely unblemished. The high weight distribution catches out most owners when pushing or paddling about, resulting in shallow scrapes and scratches. Gray's bike seems to have escaped such insults.
Really lovely condition. Nice rabbit hutch too ;-)
This is where the red screen came from - not to Gray's taste but maybe suits Lancaster Red rather better than Charcoal Grey (Metallic).

Cheers Gray.

Friday, July 26, 2013

Things that haven't worked

I have documented many changes on this blog. My recent review of modifications have caused me to think a bit more about how well or how badly some of my efforts have worked out. So here is a list of things that have not gone so well. They are my attempts to 1/ paint the engine covers, 2/ paint on the rear brake caliper, 3/ wheel paint, 4/ repaint filler cap surround, and 5/ fit an oil pressure gauge. So, as you can see, it turns out my painting skills aren't really up to snuff :-(

1/ Clutch cover
First off, the clutch cover was in a horrible state. I had a go at getting all the old paint off but it was a struggle and couldn't remove all traces from the sections where it bolts on. There are quite a few difficult recesses and angles. The result over time is that my paint has bubbled up. Also, the VHT clear lacquer has started to yellow. The other covers I painted have not bubbled or yellowed, as far as I can tell. I put the clear lacquer on much thicker for the clutch cover than the others because I had polished up the Triumph logo. I wanted to make sure it was protected from the elements. In retrospect, I wish I'd gone easier with the lacquer and committed myself to keeping the Triumph shiny with autosol.

2/ Rear caliper
Perhaps I'm wrong to list this as a 'didn't work'. I had a brake fluid leak when I was bleeding the rear caliper. I thought I'd cleaned it all off afterwards but evidently didn't do a great job. Smoothrite is definitely not brake fluid proof. However, the Finnegan's special metal primer has largely shrugged it off, much to my surprise.
Smoothrite doesn't like brake fluid
3/ Wheel paint
I took quite a lot of trouble over the wheels. Really good degrease etc. then topped off with enamel red and clear lacquer. However the plain fact is that the finish is not robust and has chipped off in many places. I plan to get the wheels powder coated. I still like the red centres and silver rims but I'm thinking of trying a graded transition between the colours rather than a clean line. I've seen some three spoke wheels done this way. It could work on my six-spokers. I'll use the wheels from my Daytona whilst they are away. That's a nice thing about having a pair of T300s.
Enamel paint chips and scratches easily
4/ Fuel cap surround
Wheel paint doesn't like petrol
I stripped the tatty paint off of the filler cap surround when I was treating the tank with POR-15. I used aluminium wheel paint. First trip out, I dribbled some fuel on it getting the nozzle out at a petrol station. It immediately ate into the paint so now it looks tatty again. I had hoped it would be up to challenges like this because, after all, wheels live in a harsh environment. This paint is an acrylic formulation. Acrylic paint is just a terrible idea if there is any risk of getting petrol on it.

5/ Oil pressure sender
I bought the oil pressure and temperature gauges with senders (sensors) from the same supplier. They were cheap! Now, the temperature gauge has worked flawlessly and I have found the information it has provided reassuring and credible. Most of the time, for example, it hovers between 70 and 80 degrees. The factory manual specifies an oil pressure check with the engine warmed to 80 degrees. So that adds up. For what it is worth, the highest oil temperature I have seen was in Coventry on an extremely hot day after filtering in traffic for about 30 minutes. It was 97 degrees! Literally fry-an-egg temps. The engine shrugged it off though in its typically nonchallant power station kind of way, assisted by energetic blasts from the fan.
Faulty oil pressure sender
 The pressure gauge has always behaved strangely, jumping and falling by tens of psi for no obvious reason. It now reads 100 psi  (it's maximum) all the time. I've checked continuity and the wiring is fine. The sender is bust. I'll get a better quality replacement sender and see if it drives the gauge properly.

Work still to do
This is not a thing I have done wrong (a sin of commission) but things not yet done (sins of omission?). I decided to fix up my Trophy from the inside to the outside. The outside - especially the fairing panels - have yet to receive any TLC beyond cleaning. Their time will come, probably next winter.

Old scratches are still old

Ride safe!

Sunday, July 21, 2013

An alternative windscreen

Gray, a friend of this blog, kindly sent me a high screen to try on my Trophy 1200. I've been pretty happy with the standard model but it is not big on wind protection. I am able to minimize wind noise by sitting right up and back on the seat, thereby keeping my head clear of the turbulent air. Having gibbon-like arms is an asset in this regard. If I get my head right down, I can just duck under the wind blast but this is not a practical prospect for any distance as the angle my neck must take makes it tough to sustain.

Consequently, Gray's offer meant I could see what it would be like to have an extended screen with a 'flip' curve about three inches from the top. This particular screen also has a red tint, the attractions of which are clearly a matter of personal taste. I found out some time ago that T-Cut Metallic works very well as a polish for some plastics. So it turned out with whatever the red screen is made of (I'm guessing it is acrylic).

The pictures below show how the two compare from the front. Apologies for the quality - I'd leant my normal camera to my son so was using my old phone today.

When I first mounted the red screen, the difference in reds really clashed. I don't think of myself as particularly fashion aware yet it offended even me. The standard clear screen has black section where it attaches to the upper fairing. This hides the relatively unattractive underside of the clocks and inner trim. I decided to do something similar with the extended red screen, with the simple expedient of running strips of black electrical tape along its lower edge. Two thicknesses did the trick. It meant the two shades of red do not directly overlap and, in my view, made all the difference to its visual acceptability.


I mounted the red screen with stainless fasteners because the Allen heads in the originals were a bit loose. And I hate rust so I don't need much incentive to reach for stainless steel. Having sorted out the fixings,  I headed out for a ride. Some friends were going to Sammy Miller's 'MotoItaliano' Day and thought it would be nice to ride down in the afternoon to show them what it's like to have a bike with soul that does not fall apart in normal use :-) I'd visited Sammy Miller's recently and really enjoyed it as well. It should have been a triple win.

I confess I had not fully thought this through. We have been experiencing the biggest heat wave for years. And I was fitting a longer screen to reduce the amount of breeze I'd be able to enjoy ... Doh! The trip started well, with little hindrance before Salisbury. The screen has moved the turbulence up by about four inches, I'd say. It is hard to be precise because the place it hits my helmet seems to vary with road speed. I found I could duck down out of the wind blast completely without the silly neck contortions of yore. It still is a crouch though so not something I'd want to do for an extended period. Visibility through the screen was good, except for where the flip begins - it was distorted there. Not hard to avoid that though.

I took a wrong turn in Bournemouth, ending up trickling along in holiday traffic from suburb to suburb with the Mighty 1180cc T300 doing a good impression of Drax. Double Doh!!


I got to the museum just as things were packing up, so triple Doh then. However, I found another T300 owner there. I think he was a volunteer or helper at the museum but I'm not sure. He had a 1998 Trident in silver and blue with only 7500 on the clock. So we chewed the fat for a bit. I also got a good look at the Moto Guzzi V8 racer. Just extraordinary. There seemed to be as much bike in front of the handlbars as behind! I hadn't previously realised the V8 was fore-and-aft, in effect two transverse fours coupled together. Really, an amazing feat of engineering.

I came home a different route, via villages and B roads from Ringwood up to Shaftesbury. I stopped to take in the views and enjoy my little flask of tea on the edge of a wood, where I saw a sign for a classic bike company. I don't know anything about it - the website doesn't help much. Cool sign though.

BUGAD Classic Bikes
More views of the screen. I quite like the red effect. I haven't made up my mind about the length of the screen and the flip. There was a hot blustery wind on my return journey and the screen moved about more than the standard version. It felt a bit as though it was catching the wind more. I'm unsure though - need to put some more miles on to know. I think a proper test would be an extended motorway trip, on a cold day.

Profile from the right with high screen

Rider's view through high screen


 Sun-dappled woods in summer time. You can't buy it. I've heard rain is on its way. The memory lives on.

Tuesday, July 16, 2013

My modifcations in review

I've made a number of changes to my Trophy 1200 as part of refurbishing it. I've wanted to keep them all modest and reversible because for me this is a significant bike and I feel committed to honouring the engineering integrity of the bike as the designers created it. I think all of the changes shown on this page have been described in previous posts but I thought it would be nice to see them all in one place.


1. The wheels were painted with red centres when I acquired the bike - I liked the look very much though the original finish would have been all silver. So I repainted them in the same non-standard scheme. The quality of the paint I used isn't great, having chipped off with road use. I want to get them powder coated at some point.

2. My original silencers rotted through on the RHS so I needed replacements. I had some stainless Viper pipes that went straight on. They are well made, considerably lighter than the originals and acceptably silenced (I have fitted them with the restrictors supplied by Motad, who manufacture them). 

3. I have fitted Scott Oilers to my bikes for years. I made up an aluminium bracket to direct its oil delivery tube to the chain rollers, just in front of the rear sprocket.

4. The thrust delivered by the first generation 1200 is considerable. I fitted a one tooth larger front sprocket (19 rather than 18 teeth) and a smaller rear sprocket (42 rather than the 45 teeth fitted when I got the bike). The means the bike revs lower in top gear. In top gear, it is doing about 4000rpm at 70mph - just coming on cam. I'm in two minds about this. For roll-on overtaking, 65mph would be better.
Note: I've recently changed this by keeping the 19 tooth front sprocket but refitting the 45 tooth sprocket for a big trip to Yorkshire and like the result - 4000rpm at 65mph in top gear.


5. I've always enjoyed a bit of metal polishing. So although I painted the rear of the footrest hangers, I left the front portions bare - they come up lovely with Autosol Solvol.

6. Venhill stainless braided hoses with stainless fittings for front and rear brakes and the hydraulic clutch. I didn't trust the original rubber hoses any more and wanted to keep the original front calipers. So stainless hoses were an obvious modification to make. I'm a big fan of stainless steel and don't need much excuse to lavish it on my bikes.

7. Stainless fixings for rear brake torque arm and mudguard retainers - they get a lot of weather here and my mild steel originals were too badly corroded to reuse.

8. Only just visible here but stainless overbraiding for coolant hoses. They amount of naked rubber on view didn't appeal to me too much so I decided to get a braiding kit. I'm pleased with the results, though they were fiddly to fit and I made up my own finishers from hose clips and some spare thin stainless sheet I've had for ages.   

9. The fairing inner panels are retained by chemically blacked flanged screws as standard. Well, few were left on my bike - quite a number bodged with plastic number plate bolts. I found some stainless flanged Allen headed screws which worked with new replacement genuine retaining clips. I am very pleased with this small mod. 

10. Not sure it's a mod - more of a repair really. A car clock was fitted into the right-hand fairing inner trim, a previous owner having cut a circle out to accommodate it. The clock was not waterproof and had failed. Triumph made an official kit to do this later on which came with a replacement inner with a moulded hole to accept a robust waterproof digital clock. I'd like to fit one of these eventually but in the mean time, I made up a simple aluminium cover to clamp over the hole.


11. Digital oil pressure and oil temperature gauges. The temp gauge has been great. The pressure gauge has been rubbish - same manufacturer, pot luck I guess.

12. Replacement fork springs from Sprint Manufacturing, 20 per cent stiffer than stock. This is a very functional mod. After 21 years, the stock springs were inevitably rather tired. I took a chance on stiffer than standard because I like a firm ride and it is a heavy bike. I'm happy with this modification, after having experimented with different lengths of spacer to adjust the preload on the springs. I'm pretty sure the springs and spacers I removed were not stock so it is hard to compare them.

13. Forks pulled through 30mm more than stock. The stiffer springs made the bike sit up considerably - as might be expected. A 30mm pull-through gives the bike as an even aspect when viewed from the side on the stand, and more importantly it feels like the right amount of lean forward for me when in motion.

14. Meriden Triumph Trophy patent badge. This is purely cosmetic, though it does protect the yoke from my key fob. Later Hinckley Triumphs have a very similar plaque just here.


15. Fender extender plus additional mud flap. Amazingly functional, possibly anticosmetic (beauty lies in the eye of the beholder), but my oil cooler was in  a shocking state and these keep the muck and spray off it it. So I'm happy. I also fitted a mud flap in front of the rear wheel to protect the shock linkages.

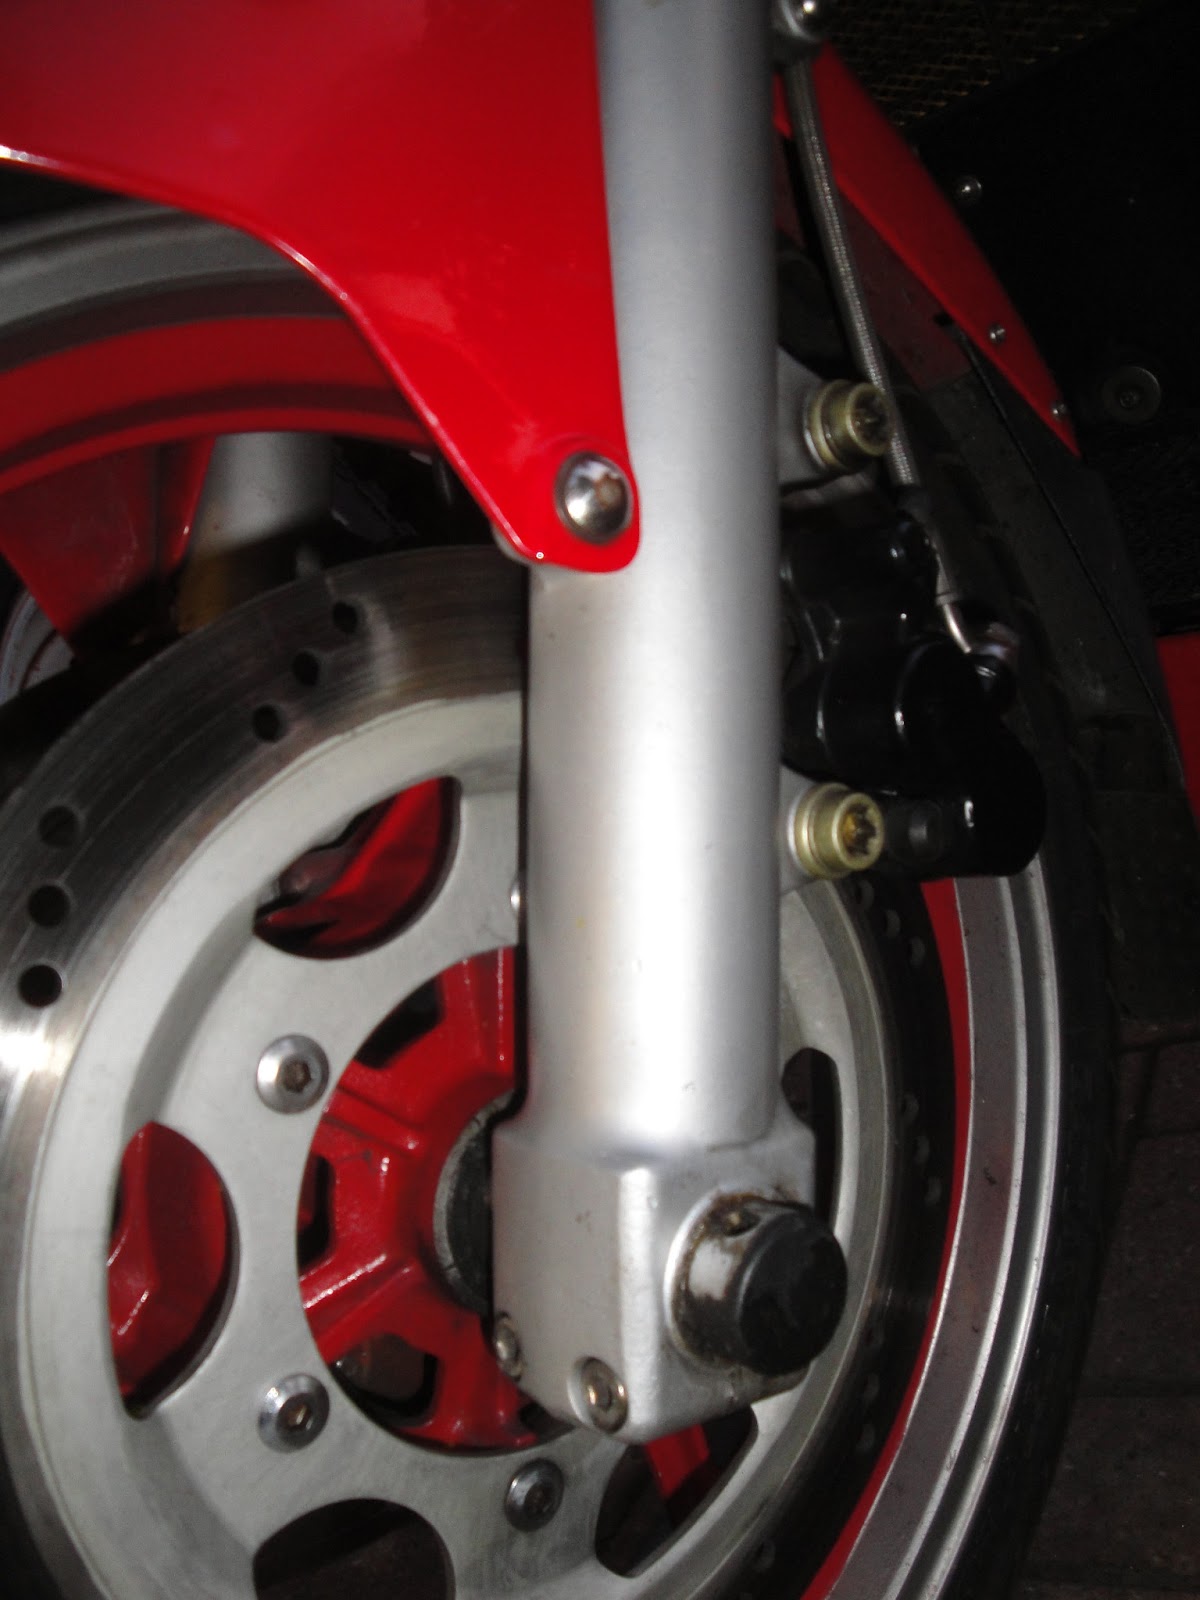
16. Stainless M8 axle clamp bolts. Down at this level, all fasteners lead a very hard life. Stainless steel just shrugs it off. MUST be fitted with copper grease of they will seize in the aluminium.

17.  Ferodo sintered brake pads and stainless brake pistons in rear brake caliper. Brake pad material has come on amazingly in the last 20 years. These pads work well and are kind to the original stainless steel discs. They squeal at low speed but have great bite and make the low-spec brakes more than acceptable.

18. Stainless steel fixings for the fairing lowers and oil cooler mounts. All the fixings at this level were in terrible condition - beyond rescue. Again, parts of the bike at this level lead a very harsh life. The replacements are a mix of stainless steel self-tapping screws with stainless plain washers, and M6 socket-headed screws with penny washers.

19. Painted large Torx bolts. I reused as many of the original fixings as possible. I probably should have had them galvanized. I might yet do this.

20. Car horns, running through an electrical relay. The original horns were in a bad way with rust. In any case, I believe in having VERY LOUD horns. I normally fit air horns to my bikes. This time I decided to try a pair of these FIAMM-like snail horns. They are very satisfying. And yes, loud.
They draw a lot of current so need a relay - the standard switch is not adequate.

21. Later, larger radiator. This is another mod I'm not sure was necessary. I've still got the original and may refit it in the future. The fan has been coming on a lot in the recent hot weather after a steep climb at town speeds. And it does its job. I was worried about the fan cutting in at first - now I just think that's what its for. I've fitted an additional water temperature monitor for a while (since removed) and the coolant never got near to dangerously hot. The fan sorts it out. I don't do many town miles so I think the larger radiator simply is not necessary for me. If my experiments with the later 1200 motor go well, I'll probably use it for that project, destined for the Daytona.

22. Additional aluminium mesh fitted behind later plastic radiator guard. The original guard is a steel mesh. The plastic guard looks insubstantial by comparison.

23. Stainless button-headed fairing upper fixings. The original fixings have large, chromed mushroom head socket screws with a plain section that protects the polyurethane panels and M6 threads that locate behind. The size of the socket is small and easily rounded out, for all that they should not be tighted up too much, and are rust prone. I could only save two of these in my set.

24. Stainless button-head M6 machine screws for upper mudguard mountings/brake hose retaining bracket. The rear of these get all the muck inside the mudguard and can seize.

25. Red Triumph patent badges - glued onto the fairing lowers by a previous owner with some kind of space super glue. Actually, I really like them.

26. Purely an anachronistic indulgence - a Meriden 'Made in England' decal so familiar on the older Triumphs.

27. Gel battery (not pictured). Not sure if it counts as a modification. Just trying to be comprehensive.

28. Later mirrors - these were fitted to the bike when I bought it. They do work reasonably well, staying clear at speed and don't fold in. However, the mounting studs are a bit short compared to the original round ones (as were fitted to my Daytona) and half the mirror is occupied by my elbows. I am 6'3" so maybe shorter riders wouldn't have that problem (just falling off a lot). 

I can't think of anything else for now.

Saturday, July 13, 2013

Super!


I took a trip down to Dorset this week to meet up with a friend who has a Super III.We rode some ace B roads up to Shaftesbury - stunning weather, stunning ride, stunning company.

Outside Shaftesbury town hall

Saturday, July 6, 2013

A Long Trip Home for An Old Trophy 1200

Now there is a new Trophy 1200, it seems reasonable to describe my bike as an 'old' Trophy 1200. Those venerable owners of a '60s Trophy would no doubt laugh at the idea but time, like a living river, never ceases to flow.

For my second Big Trip, I decided I'd ride number 544 home to Hinckley. First, a spruce up:

Can't have her looking shabby, can we? In the process I found some of the paint on the rear caliper has lifted. My fault - cack handed with the brake fluid last time I bled the brakes. It is interesting to see that the special metals primer is considerably more resistant to brake fluid than Smoothrite. On the plus side, I was gratified to see that the the rubber flap I added has been successsful at keeping road muck off of the swingarm linkages. The were coated in grime but not grit and muck. Fab.

All dressed up and actually ready to go

Comfort break in Bradford on Avon - some more comfortable than others?

A Jumbo at Kemble Airfield


 I stopped at a couple of Landmark Challenge waypoints on my journey. Zoom in on the plaque at the back of the bus shelter to find out why the pub is named after Joseph Arch.

Outside Triumph Factory Number Two
 It isn't too hard to find Triumph at Hinckley after getting to Dodwell Bridge Industrial Estate - there is a sign for 'The Motorcycle Factory'. It leads to the opposite side of the estate from the A5. I have visited a couple of times before, most recently for a factory tour at the Triumph Live 2010 event. I had heard that tours don't run any more so did not expect to be able to do anything other than photograph the bike outside and so it turned out. Friday afternoon may not be the best time to visit because I think the factory is in maintenance mode then.


Those of you who have followed Triumph from the early '90s may recognise the name Jacknell Road. It is the site of the original Triumph Hinckley factory that burnt down in 2002. I was unsure if the site was at all active, or even if it was still owned by Triumph. But this is where my bike - and all 1990s Triumphs - were made. This is as near to 'home' as it is possible to imagine for number 544. So I decided to drive up and down it, just because I'm soft in the head in precisely this sort of way.


My reward was to see that the site is definitely owned by Triumph, very active and called Triumph Motorcycles Factory 1.  A very friendly and professional security guard took the trouble to phone into the factory to ask for permission for me to photograph my bike in front of the building (thanks Kumar!). That was what I had hoped to do. Better yet, a superb gent called Mark came out to see my bike and talk to me about it. Thanks very much Mark. You made my day.

Mark is in the warrantees and service arm of the business. His top tips for keeping T300s in good shape is to always use a torque wrench when tighting up the chain adjusters and to change your coolant no less frequently than every three years. Especially the coolant! You have been warned.

Any nothing much else troubles him in the servicing line for T300s. They are built like tanks, as we know.


 Last Landmark of the day: Moira blast furnace near Burton-on-Trent

Hand prints were cast into the uprights at the heart of the Moira furnace

OK, so it is clear that Triumph Motorcycles Limited has a loose connection to the firm that Mr Edward Turner made famous but I wanted to visit Meriden, where the second Triumph factory used to stand. The connection between Meriden and Hinckley Triumphs is deeper than corporate historians can see. A number of the former employees of the Meriden factory went to work at the Hinckley plant. One of them featured in an early Hinckley brochure coach lining Thunderbird tanks. Even if that was not the case, the care and enthusiasm lavished over these machines, whether made in Meriden or hewn in Hinckley, has infused them with something of a shared spirit. Their common heritage, not just the name on the tank, sees a number of them in common ownership today. So I don't think it entirely silly that I chose to stop by Meriden, to ride the roads that factory testers would have belted along on T20s, T90s, T100s, T110s and of course the unapproachable T120. Hearing the totally different sound of a T300 echoing off of the town walls, filling the centre around the monument to fallen cyclists, I was sure the ghost of Mr Turner would have smiled in appreciation.

Late in the day, so it was all closed up, but the National Motorcycle Museum is only a few miles away from Meriden so I pulled in for a couple of pictures. 

A legend outside ...

... where Legends Live On